Cache Lab: Retrieving things, quickly
Released: 12:00 AM Monday, April 13th, 2020.
Due: 11:59 PM Friday, April 24th, 2020.
For this programming assignment, we will explore cache associativity by writing a simulator.
Weight: 10% of your total 50% Lab Grade
Introduction
Here, we will be looking at caches. To do this we will write a simulator in C that will implement a basic associative cache.
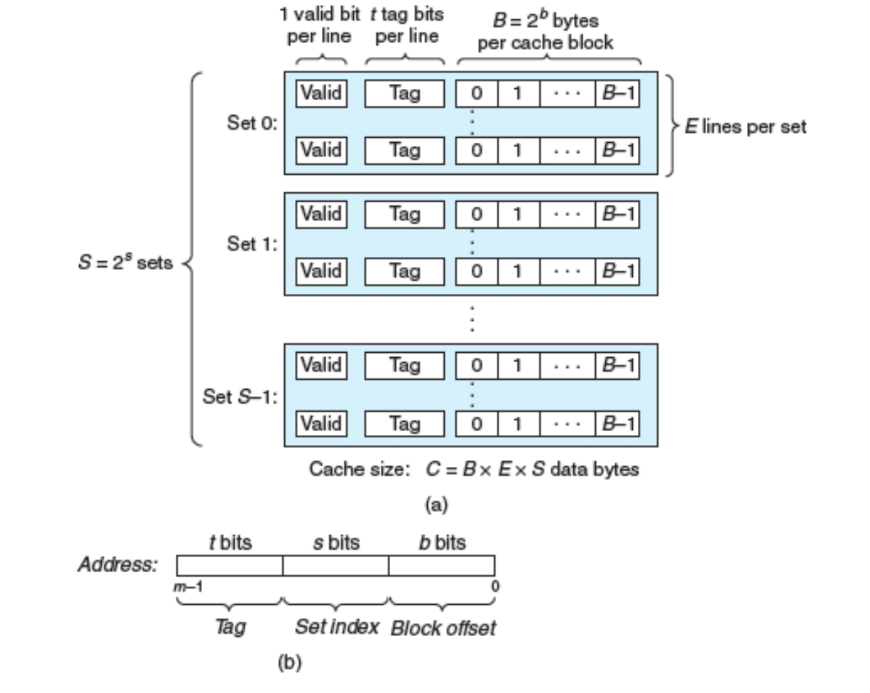
If you recall from lecture, an associative cache is when you have a set of slots. To determine which slot data is cached within, you just hash the address used. There is one absolutely easy method that is often used, just use enough bits in the address to disambiguate.
Let’s say, the cache holds blocks of 64 bytes of data each. In this case, 6 bits would determine the offset within the cache block. That is, all addresses that share the remaining higher 26 bits are point to the same cache block.
So, the next bits would reflect the cache slot! If we have 4 cache slots (4 sets) then 2 bits would suffice to determine which slot it falls into. That would be bits 6 and 7. (We start counting at bit 0, remember.)
Why would we not use the highest bits? Well, because of locality! We want our cache to hold adjacent blocks. So we want to use the lowest bits possible to determine the cache set.
These bits are called the “set index” and, again, every address that refers to the exact same block will have the same exact set index.
The remaining bits are called the “cache tag” and this disambiguates the blocks that are in the cache. This comes into play later when we are dealing with associativity and eviction.
Now, we want to consider how to determine which bin within the set the block will ultimately go.
Associativity
Recall from lecture that we can help our cache keep more blocks stored by involving associativity. In a direct-mapped cache, the slots all have only one bin. So, when we have two unique cache blocks that happen to both go to the same set (they have the same cache tag,) then they would conflict and one will “evict” the other.
Lecture showed us that we can simply just add extra bins that content that would otherwise be evicted can just fall into the other bin. Eventually, we will fill every bin, of course, and then one would have to be evicted. The number of bins is referred to as the cache’s “associativity.”
How do you know which bin a cache block goes into? Well, that’s completely up to you. It does not actually matter. When the cache is looking for a “hit,” it is forced to compare against every bin. That’s the trade-off… it’s flexible to have lots of bins but very impractical since it is slow to check for ‘hits’ which defeats the whole purpose.
Eviction
How do you know which to evict? Well, there are many strategies. In this assignment, we will be implementing the LRU policy. In this scheme, you evict the item that was Least Recently Used.
How do you keep track? You need some notion of “time” in order to keep track of which block has been least recently accessed. When you place the block into cache (on a cache miss!) then you set the time in your cache metadata for the block. When it is accessed again (hit) you update the time. Then when you evict, you scan the full set for the bin with the smallest time.
It is probably easiest to “fake” the time. It only actually matters that one access has a higher time than the last. You do not have to actually store the wall clock time, just apply a monotonically increasing value to each access.
Downloading
To get the boilerplate code and the testing harness for this assignment, use the following command on thoth:
wget https://wilkie.github.io/cs449/labs/06/cachelab-handout.zip
This will download the cachelab-handout.zip file to your (private) directory on the thoth Linux machine (make sure you are logged into this!) in which you will do your work.
Then issue the command:
unzip cachelab-handout.zip
This will cause a number of files to be unpacked in the directory cachelab-handout.
Navigate to that directory and look at the files.
The file you will be modifying is csim.c.
The csim.c file contains a skeleton for the functions that you will implement to fulfill the needs of the cache simulator.
Consult the README file for a more thorough description of the files and how to use them.
Usage
Included in the handout package is the csim-ref program that implements the
proper solution that you can change yours against.
Both your simulator and csim-ref will interpret valgrind memory traces.
The traces are located in the traces directory and were created by a Linux
program as such:
thoth $ valgrind --log-fd=1 --tool=lackey -v --trace-mem=yes ls -l
Which will trace the memory usage of the ls command and toss out the memory
accesses to the terminal (stdout).
Here is an example trace:
I  004005b6,5
 L 7ff000384,4
 S 7ff000388,4
 S 7ff00038c,4
 L 7ff000388,4
Each line is of the form:
[space]operation address,size
Where [space] is a literal space, as seen above, and operation denotes the
type of access. I denotes an instruction load (note, no space in front),
L is a data load, S is a data store, and M is a data modification
(which is shorthand for a load followed by store to the same address.)
The address field denotes a 64-bit memory address in hexadecimal form. This
is followed by size, a decimal (base 10) value indicating how many bytes are
stored. For our purposes, all accesses are word-aligned, so the size will never
matter and can be ignored.
You can run your simulator (or csim-ref) with the following command:
thoth $ ./csim -t traces/dave.trace -s 8 -E 4 -b 12
This runs the simulator for a cache that uses 8 set index bits and 12 offset
bits and is 4-way associative. It is running the dave.trace trace file.
Here, there are 256 sets and 4KiB blocks (S and B respectively).
It will report the number of evictions, misses, and hits.
Implementation
You have to implement only three functions. I have nicely provided the trace
reading function for you in replayTrace.
You will implement your own cache data structure. You’ll need a structure for each cache set and then for each cache block (referred to as a cache line.)
Then you will implement a function to allocate the cache data structure in
initCache. You can simply allocate the entire cache before hand, if you’d like.
Then you will also implement a function to free the cache data structure in
freeCache.
The accessData function is the main hunk of beef for this assignment. Here,
you are passed an address (an integer representing the location in memory you
are accessing.) You will interpret that address and determine the index of the
set (slot) and also the cache tag (to compare against the bins.)
Your accessData needs to update global variables hit_count, miss_count
and eviction_count whenever any of these events occurs.
There are a few helpful global variables that are initialized with the cache size requested.
S holds the number of sets to use for the cache.
E holds the associativity of the cache.
B holds the block size in bytes.
b holds the number of bits that represent the block offset.
s holds the number of bits that represent the cache set.
Here is another visualization of how the address bits are used to determine where in the cache a particular block will go:
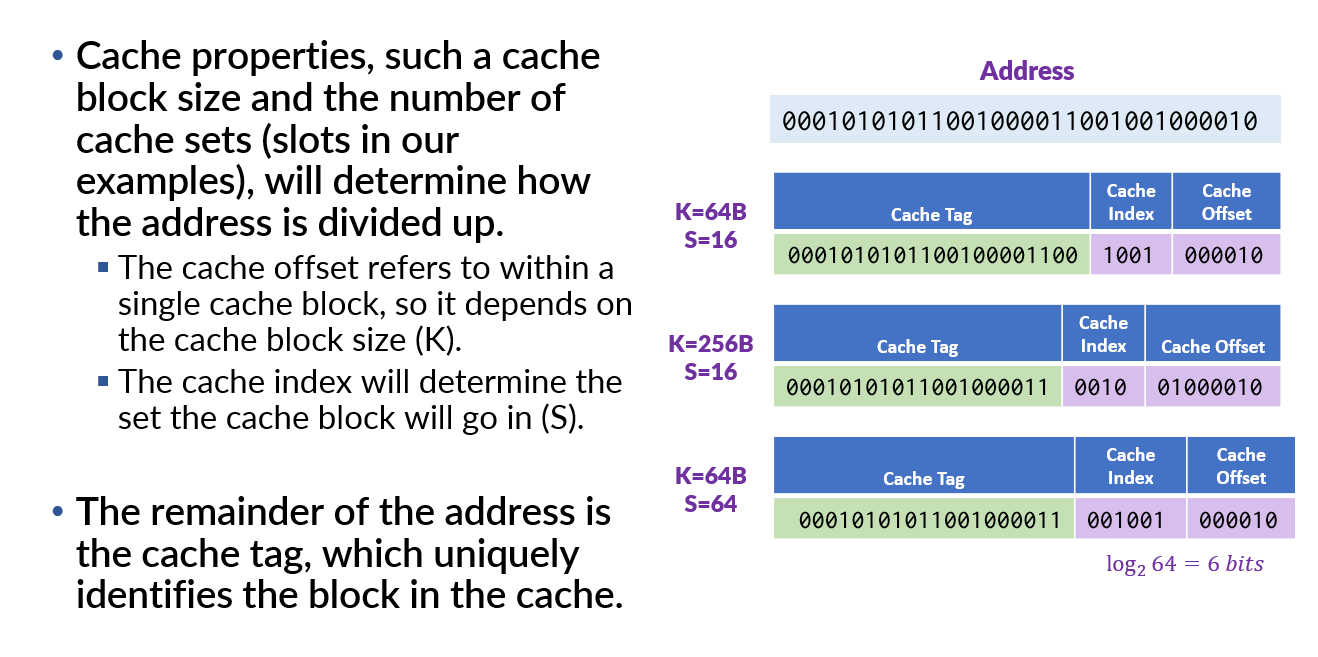
So, with these… how do you pull out the cache set from the address? How do you pull out the cache tag?
So, don’t overthink this. My implementation of accessData is 60 lines.
My initCache and freeCache are just 4 lines each.
Evaluation
You will be evaluated on a set of traces and combinations of cache sizes that
are randomly generated. To run a set of static evaluations locally, you can use
the driver.py script:
thoth $ python ./driver.py
It will give you a local score that should highly reflect your potential score once you submit to the grader. Make sure you also test different values against the reference simulator. The grader will report the command line arguments passed to your program that did not match the reference simulator upon failure so you can debug and resubmit.
Submission
You only need to upload a single file csim.c to Gradescope for this assignment.
You may submit as many times as you like until the due date.